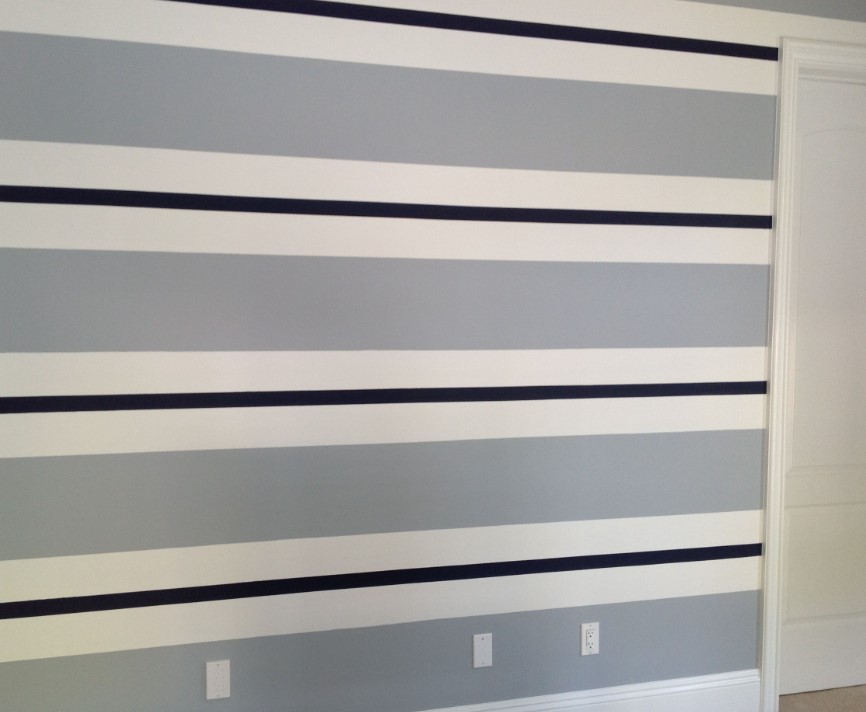
Creating Striped Walls: A Step-by-Step Guide
- Gather your supplies: painter’s tape, measuring tape, paint, brushes, and drop cloths.
- Prepare the wall: clean, patch, and apply primer.
- Measure and mark guidelines for your stripes.
- Apply painter’s tape along the guidelines.
- Paint using a brush or roller along the tape’s edges.
- Remove the tape while the paint is slightly wet for clean lines.
- Perform touch-ups if needed and let the paint dry.
Now, let’s get into details:
Transforming your walls with stripes is a fantastic way to add a touch of elegance and personality to your space. At Simpco Painting, your trusted residential painting service in Richmond, VA, we believe in helping you achieve the look you desire. In this guide, we’ll walk you through the step-by-step process of painting stripes on your walls, allowing you to revitalize your interior with creativity and precision.
Gathering Your Supplies
Essential Painting Tools
Before you embark on painting stripes on your wall, it’s essential to gather the necessary tools and supplies. Here are the essential painting tools you’ll need:
- Painter’s Tape: High-quality painter’s tape helps create clean, crisp lines for your stripes. Ensure it’s designed for delicate surfaces if you’re painting over existing paint.
- Measuring Tape and Level: Accurate measurements are crucial for evenly spaced stripes. A measuring tape and a level ensure precision.
- Pencil and Chalk: These help mark your measurements and guidelines lightly on the wall, which can be easily erased or painted over.
- Drop Cloths: Protect your floor and furniture from paint splatters with drop cloths or plastic sheets.
- Paint Trays and Rollers: Use paint trays to hold your chosen paint colors, and high-quality rollers for efficient coverage.
- Paint Brushes: Small brushes come in handy for touching up edges and corners.
- Paint: Select the paint colors you want for your stripes. Ensure you have enough paint for your project.
- Paint Stirrers: Stir your paint thoroughly to ensure consistent color.
Selecting Paint Colors
Choosing the right paint colors for your stripes is a creative decision. Here’s how to go about it:
- Complementary Colors: Consider using complementary colors for a striking contrast or shades from the same color family for a subtle, harmonious look.
- Sample Swatches: Purchase small paint samples to test on a small wall section before committing to your final colors. This allows you to see how the colors look in your space and under your lighting conditions.
- Consider Room Decor: Think about your existing room decor and furniture. Your chosen stripe colors should complement your interior design.
- Number of Colors: Decide how many colors you want to use for your stripes. Whether it’s two or more, make sure they work well together.
By gathering these essential tools and carefully selecting your paint colors, you’ll be well-prepared to embark on your stripe painting project with confidence and precision.
Preparing the Wall Surface
Measuring and Marking
Before you start painting your stripes, meticulous measuring and marking are crucial to achieving a professional-looking result. Here’s how to go about it:
- Determine Stripe Width: Decide on the width of your stripes. Measure and mark the starting point for your first stripe, typically at one corner of the wall.
- Use a Level: To ensure that your stripes are perfectly straight, use a level to draw horizontal guidelines across the wall. These guidelines will serve as the reference for your stripes.
- Measure Spacing: Measure the desired space between each stripe and mark it along your guidelines. Use a measuring tape for accuracy.
- Check for Symmetry: Step back and assess the symmetry and alignment of your markings to ensure that your stripes will be even and visually appealing.
Wall Surface Preparation
Proper wall surface preparation ensures that your paint adheres well and your stripes look flawless. Here’s what to do:
- Clean the Wall: Remove any dust, dirt, or imperfections from the wall’s surface by wiping it down with a damp cloth. Allow it to dry completely before proceeding.
- Patch and Sand: Fill any holes, cracks, or imperfections with a suitable patching compound. Once it’s dry, sand the patched areas to create a smooth surface.
- Prime the Wall: Applying a primer can help ensure even paint coverage and prevent uneven absorption of paint. Use a primer that’s compatible with your chosen paint.
- Tape Over Guidelines: Carefully apply painter’s tape over the guidelines you’ve drawn. Ensure it adheres firmly to prevent paint bleed.
Properly measuring, marking, and preparing the wall surface is essential for achieving the desired look and ensuring that your painted stripes appear sharp and well-defined. Taking your time during this stage will pay off in the final result.
Creating Straight and Uniform Stripes
Using Painter’s Tape
To achieve straight and uniform stripes on your wall, proper use of painter’s tape is essential. Here’s how to go about it:
- Apply Painter’s Tape: Carefully apply painter’s tape along the guidelines you’ve drawn on the wall. Ensure that the tape adheres firmly and lies flat against the wall.
- Press and Seal Edges: Use a plastic putty knife or the edge of a credit card to press down the edges of the tape firmly. This prevents paint from seeping underneath.
- Create Crisp Corners: When you reach corners or edges, fold the tape to create crisp corners for a professional finish.
- Mask Adjacent Stripes: If you’re creating multiple stripes with alternating colors, use painter’s tape to mask off the areas where you don’t want paint to go.
- Double-Check Alignment: Before you start painting, double-check that the painter’s tape is aligned with your guidelines to ensure straight and even stripes.
Paint Application Techniques
Now that your painter’s tape is in place, it’s time to apply the paint for those perfect stripes:
- Brush or Roll: Depending on your preference and the width of your stripes, you can use a paintbrush or a roller. Make sure your brush or roller is clean and dry.
- Painting Technique: Apply paint by moving the brush or roller parallel to the painter’s tape. Start from the edge of the tape and work your way towards the center of the stripe. This minimizes the risk of paint bleeding under the tape.
- Multiple Coats: Depending on the opacity of your paint colors, you may need to apply multiple coats. Allow each coat to dry thoroughly before applying the next.
- Remove Tape Carefully: After the final coat, while the paint is still slightly wet, carefully remove the painter’s tape at a 45-degree angle to ensure clean lines. Be cautious not to smudge the painted stripes.
- Touch-Ups: If needed, touch up any areas where the paint didn’t adhere perfectly to the wall or where there are minor imperfections.
By following these painter’s tape and paint application techniques, you can ensure that your wall stripes are straight, uniform, and visually appealing. Taking your time and using the right tools will lead to a professional-looking result.
Finishing Touches and Tips
Removing Painter’s Tape
As you near the completion of your striped wall, proper removal of painter’s tape is crucial for a clean and polished finish. Here’s how to do it:
- Timing is Key: Remove the painter’s tape while the paint is still slightly wet. This helps prevent the paint from bonding with the tape, ensuring clean lines.
- Angle Matters: Carefully peel off the tape at a 45-degree angle, pulling it away from the painted surface. This angle minimizes the risk of paint peeling or chipping.
- Go Slow and Steady: Take your time when removing the tape to maintain the integrity of your stripes. Rushing this step can lead to uneven lines.
Touch-Ups and Final Inspection
Before you consider your striped wall complete, perform touch-ups and a final inspection to ensure perfection:
- Inspect for Imperfections: Examine the wall closely for any imperfections, smudges, or areas where the paint may not have adhered perfectly. Address these issues with touch-ups.
- Blend Touch-Ups: When performing touch-ups, use a small brush and match the paint color precisely. Feather the touch-up paint into the surrounding area to create a seamless look.
- Let It Dry: Allow the touch-up paint to dry completely before stepping back to admire your beautifully striped wall.
Final Words:
Painting stripes on your walls is a creative and rewarding DIY project that can transform your living spaces. If you ever need professional assistance or expert advice on interior painting, remember that Simpco Painting is just a phone call away. Contact us at 804-840-9419 for top-notch residential painting services in Richmond, VA. Elevate your home’s aesthetic appeal with confidence and precision.